Table of contents
What is CodeDeploy & what are its features?
AWS CodeDeploy is a fully managed deployment service provided by Amazon Web Services (AWS). It automates software deployments to a variety of computing services like Amazon EC2 instances, AWS Lambda functions, and more. Here are its main features in brief:
Automated Deployments: CodeDeploy automates application deployments, reducing manual errors and deployment time.
Deployment Across Environments: It supports deploying applications to multiple environments, such as development, testing, and production.
Rollbacks: CodeDeploy allows easy rollback to previous versions in case of issues during deployment.
Integration: Seamlessly integrates with various AWS services, including EC2, Lambda, and on-premises servers.
Deployment Hooks: Customizable deployment scripts (hooks) enable pre and post-deployment tasks.
Rolling Deployments: Can perform rolling deployments to minimize downtime and ensure high availability.
Application Health Monitoring: Monitors the health of deployments and rolls back in case of failures.
Deployment Configuration: Offers flexibility to define deployment configurations for different scenarios.
Deployment History: Provides a history of deployments for tracking and auditing purposes.
Supports Multiple Platforms: Works with various application types, programming languages, and platforms.
Task-01 :
About Appspec.yaml file for CodeDeploy.
The appspec.yml file is a configuration file used by AWS CodeDeploy to manage how your application is deployed. It specifies which files to deploy, where to deploy them, and what scripts to run during the deployment process. It's a crucial component in defining the deployment workflow for CodeDeploy.
Deploy index.html file on EC2 machine using nginx
Create a new deployment on CodeDeploy service

Enter the Application name and compute platform

We have successfully created the Application- Demo-app

To create a deployment group, go to CodeDeploy--> select the Application

create deployment group

Enter the deployment group name

Scroll down and enter the service role.

A service role is used to permit roles to the service.
To create a service role, You can refer to the blog- Day 49: Identity & Access Management
OR
You can follow the below steps:
Go to IAM--> Roles--> Create role

Select AWS service

Check Permissions

Enter the Role name and create a role

The role has been created successfully.

This role will need multiple permissions. Go to code-deploy-role--> Permissions policies--> Add permissions--> Attach Policies

Select the desired permissions


Coming back to deployment creation

Select the Environment configuration

In this case, we select Amazon EC2 instances.
At the same time, we will need to create an EC2 instance.

1 unique matched instances means that the system has found one running EC2

Instead of installing AWS CodeDeploy Agent, we will write a list of commands on EC2 and install the agent.

As this is a demo app, we can uncheck the load balancer and Create a Deployment group

We have successfully created a Deployment group.

Setup a CodeDeploy agent to deploy code on EC2
To set up a CodeDeploy Agent on EC2, go to the created EC2 instance

Create a new file.

and insert all the commands to set CodeDeploy
#!/bin/bash
# This installs the CodeDeploy agent and its prerequisites on Ubuntu 22.04.
sudo apt-get update
sudo apt-get install ruby-full ruby-webrick wget -y
cd /tmp
wget https://aws-codedeploy-us-east-1.s3.us-east-1.amazonaws.com/releases/codedeploy-agent_1.3.2-1902_all.deb
mkdir codedeploy-agent_1.3.2-1902_ubuntu22
dpkg-deb -R codedeploy-agent_1.3.2-1902_all.deb codedeploy-agent_1.3.2-1902_ubuntu22
sed 's/Depends:.*/Depends:ruby3.0/' -i ./codedeploy-agent_1.3.2-1902_ubuntu22/DEBIAN/control
dpkg-deb -b codedeploy-agent_1.3.2-1902_ubuntu22/
sudo dpkg -i codedeploy-agent_1.3.2-1902_ubuntu22.deb
systemctl list-units --type=service | grep codedeploy
sudo service codedeploy-agent status
To install use the below commands:
bash install.sh

Task-02 :
Add appspec.yaml file to CodeCommit Repository &
complete the deployment process.
Once the installation is done on EC2, we will now need a file called- appspec.yaml. This is a configuration file for CodeBuild.
We will create a file- appspec.yaml
version: 0.0
os: linux

files:
  - source: /
    destination: /var/www/html

hooks:
  AfterInstall:
    - location: scripts/install_nginx.sh
      timeout: 300
      runas: root
  ApplicationStart:
    - location: scripts/start_nginx.sh
      timeout: 300
      runas: root
We also need to create "install_nginx.sh" & "start_nginx.sh" in the folder called "scripts"

Once done, we will commit the files to:

Now push the files to the CodeCommit.

Check CodeCommit

We will now build on CodeBuild

Click on "Start build"

After a successful build, create deployment on CodeDeploy
Revision type--> My application is stored in Amazon S3

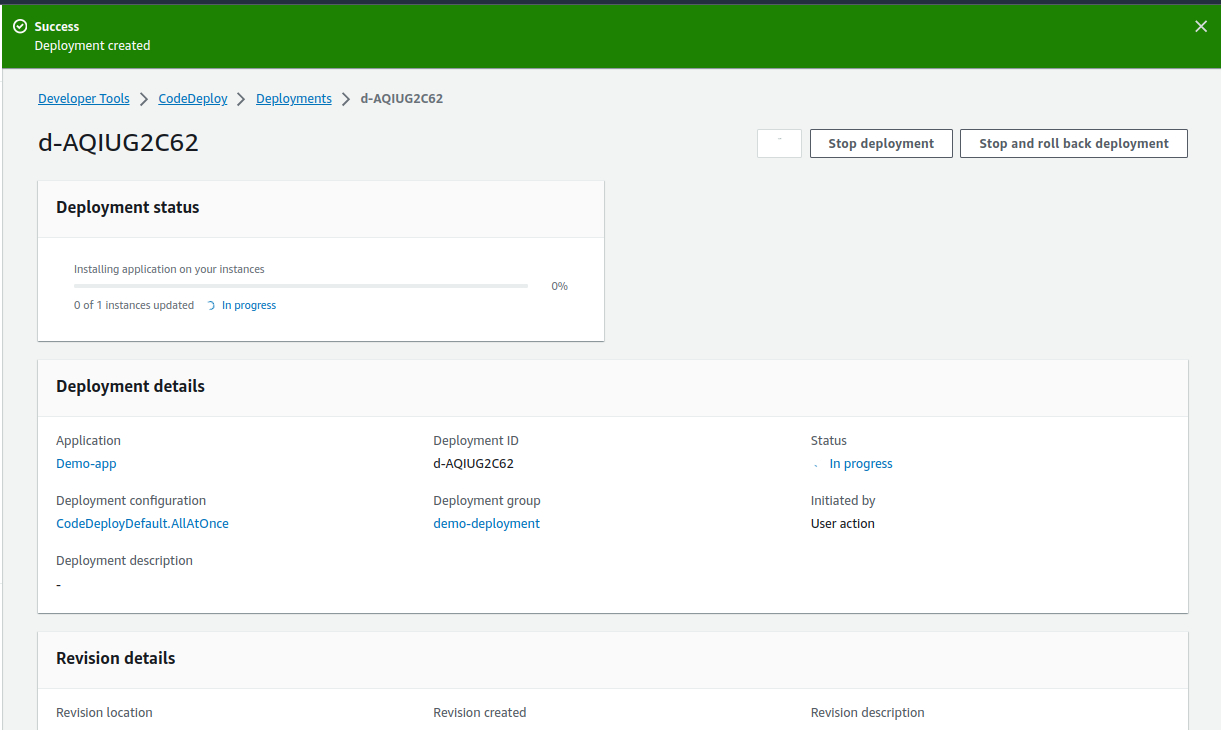
Scroll down and Create Deployment

To view the status in events scroll down.

Because, EC2 has neither permission to fetch data from S3 nor to communicate with CodeDeploy, a role needed to be created for EC2

Now to assign role to EC2 go to EC2 instance--> select EC2--> Actions--> Security--> modify IAM role

Select the created Role and update IAM role.

We have successfully added the role to the instance.

Now go to the EC2 instance and run the command to restart CodeDeploy agent
sudo service codedeploy-agent restart

Once done, you can continue with the deployment


Important Note:
There will be alot of errors while building or deploying. Make sure that few points are followed:
Use a version control system like Git to manage your source code.
Ensure that your build environment contains the necessary dependencies and tools.
Create a well structured buildspec.yml and appspec.yml. Make sure necessary settings and the file path is selected correctly in both the YAML files (i.e. build spec & app spec)
Ensure that the AWS Identity and Access Management (IAM) roles associated with your CodeBuild and CodeDeploy projects have the necessary permissions to access resources and perform deployment actions.
Set up your target instances (e.g., EC2 instances) with the necessary prerequisites, such as the required runtime environment and permissions.
Testing should be done at all the stages to check everything works seamlessly.
Conclusion:
We explored AWS CodeDeploy and its key features, including automated deployments and rollback capabilities. We also delved into the use of the appspec.yaml file for defining deployment configurations and demonstrated a practical deployment scenario on EC2 instances.
By following the step-by-step instructions, readers can gain a strong grasp of AWS CodeDeploy's capabilities and learn how to automate deployments effectively in their AWS environments. This knowledge can enhance deployment efficiency and reliability.
Reference:
CI/CD pipeline on AWS: Part-4
aminchivilkar.hashnode.dev/day-71-cicd-pipeline-on-aws-part-4
Hope you like my post. Don't forget to like, comment, and share.
