Introduction
In this blog, we will be launching EC2 with Autoscaling and also go through a few topics such as creating a template for future uses and going through the concept of Load Balancing.
What is Amazon EC2 Auto Scaling?
Amazon EC2 Auto Scaling helps you ensure that you have the correct number of Amazon EC2 instances available to handle the load for your application.

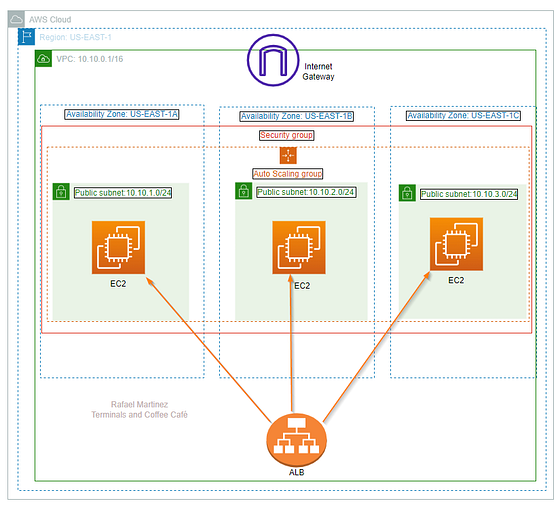
The Architecture of a Network

Creating EC2 with script
Step 1: We will go through the basic steps of launching EC2 instance but this time we will write a script that will run in the background while the instance is being initiated.
Select the desired machine and configuration

Go to "Advanced details"

Write the script below to run in the background.
#!/bin/bash/

sudo apt update -y
sudo apt install httpd -y

systemctl start httpd
systemctl enable httpd

cd var/www/html/
echo "<h1> Hello World !! </h1>" > index.html

Click on "Launch instance"

Creating EC2 template
Once the instance is up and running, we can create templates for our future uses.
Simply click on the instance for which the template needs to be created, select "Actions" -> "Image and Templates" -> "Create template from instance"

A page will pop up to create a launch template

You have successfully created the template.

Autoscaling
Scroll to the left side of the dashboard and locate "Autoscaling Groups

A new page will open and click on "Create Auto Scaling group"

Enter the name of the group & also select the template that we created previously

Click "Next" and select "Availability Zones and subnets"
VPC has selected default settings.

Click "Next" and select the type of Load Balancer
In this case, we selected: "Attach to a new load balancer". This option will create basic load balancer and attach to the auto scaling group.

As mentioned above the LB name will be "my-first-auto-scale-1" and the scheme will be "Internet-facing" with Subnets that were selected earlier.

For listeners and routing, we will create a target group - "my-first-auto-scale-1" at port- 80

We will now enable Health Checks to keep an eye at an interval of 60 seconds.

We will also enable Cloudwatch. This will monitor the whole load balancer.

Click "Next" and Set the desired, minimum, and maximum capacity of your Auto Scaling group. You can optionally add a scaling policy to dynamically scale the number of instances in the group.

We will choose Target tracking policy to use a scaling policy to dynamically resize Auto Scaling group to meet changes in demand.

Click "Next" and we will configure notification to send all the updates.

Click "Next" twice and a Review page will open to review all the configuration.
You will also have the option to configure any option on this review page.
Click on "Create Auto Scaling group"

On the dashboard, you will have the Autoscaling group

This Auto Scaling group will automatically start our desired state(i.e. 2 instances)

This group contains settings for templates, Load Balancer, Notification etc.
Conclusion:
Finally, we've successfully launched the desired state using the AutoScaling feature along with the template and Load balancer
This simple example gives you a glimpse of how to define, deploy instances and also configure settings.
Hope you like my post. Don't forget to like, comment, and share.
